汎用I/Oを使って、LEDを操ってみよう:S08ではじめるマイコン制御プログラミング(3)(3/3 ページ)
» 2008年11月27日 00時00分 公開
[高田浩,@IT MONOist]
プログラムの修正
それでは、ループの中に時間待ちの処理を入れてみます。
時間待ち処理で使われる変数tを定義する際、必ずvolatile指定子を使ってください。これは最適化を抑制するものです。これを忘れると、コンパイル時にtは未使用ということで処理が取り除かれてしまいます。
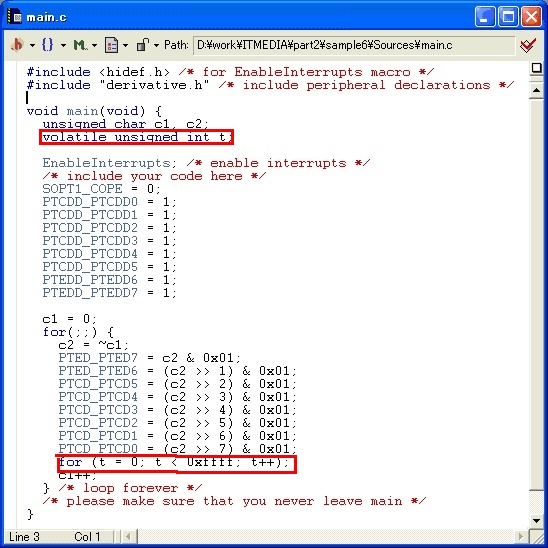 リスト4
リスト4ちょっとmain関数が煩雑になってきました。処理ごとに関数に分けてみましょう(リスト5)。
#include <hidef.h> /* for EnableInterrupts macro */
#include "derivative.h" /* include peripheral declarations */

void mcu_init(void);
void putbyte_led(unsigned char);
void wait(unsigned int);
void main(void) {
  unsigned char c;

  EnableInterrupts; /* enable interrupts */
  /* include your code here */
  mcu_init();

  c = 0;
  for(;;) {
  putbyte_led(c);
  wait(0xffff);
  c++;
  } /* loop forever */
  /* please make sure that you never leave main */
}

void mcu_init(void){
  SOPT1_COPE = 0;
  PTCDD_PTCDD0 = 1;
  PTCDD_PTCDD1 = 1;
  PTCDD_PTCDD2 = 1;
  PTCDD_PTCDD3 = 1;
  PTCDD_PTCDD4 = 1;
  PTCDD_PTCDD5 = 1;
  PTEDD_PTEDD6 = 1;
  PTEDD_PTEDD7 = 1;
  return ;
}

void putbyte_led(unsigned char c){
  c = ~c;
  PTED_PTED7 = c & 0x01;
  PTED_PTED6 = (c >> 1) & 0x01;
  PTCD_PTCD5 = (c >> 2) & 0x01;
  PTCD_PTCD4 = (c >> 3) & 0x01;
  PTCD_PTCD3 = (c >> 4) & 0x01;
  PTCD_PTCD2 = (c >> 5) & 0x01;
  PTCD_PTCD1 = (c >> 6) & 0x01;
  PTCD_PTCD0 = (c >> 7) & 0x01;
  return ;
}

void wait(unsigned int time){
  volatile unsigned int c;

  for (c = 0; c < time; c++) ;
  return ;
}
リスト5
また、せっかくスイッチがいくつもありますから、カウンタの制御用に使ってみましょう。PTA2でアップ、PTA3でダウン、PTD2で停止です(リスト6)。
#include <hidef.h> /* for EnableInterrupts macro */
#include "derivative.h" /* include peripheral declarations */

void mcu_init(void);
void putbyte_led(unsigned char);
void wait(unsigned int);

void main(void) {
  unsigned char c;
  char step;

  EnableInterrupts; /* enable interrupts */
  /* include your code here */
  mcu_init();

  c = 0;
  step = 0;
  for(;;) {
    if (!PTAD_PTAD2) {
      step = 1;
    } else if (!PTAD_PTAD3) {
      step = -1;
    } else if (!PTDD_PTDD2) {
      step = 0;
    }
    putbyte_led(c);
    wait(0xffff);
    c += step;
  } /* loop forever */
  /* please make sure that you never leave main */
}

void mcu_init(void){
  SOPT1_COPE = 0;
  PTCDD_PTCDD0 = 1;
  PTCDD_PTCDD1 = 1;
  PTCDD_PTCDD2 = 1;
  PTCDD_PTCDD3 = 1;
  PTCDD_PTCDD4 = 1;
  PTCDD_PTCDD5 = 1;
  PTEDD_PTEDD6 = 1;
  PTEDD_PTEDD7 = 1;
  PTADD_PTADD2 = 0;
  PTAPE_PTAPE2 = 1;
  PTADD_PTADD3 = 0;
  PTAPE_PTAPE3 = 1;
  PTDDD_PTDDD2 = 0;
  PTDPE_PTDPE2 = 1;
  return ;
}

void putbyte_led(unsigned char c){
  c = ~c;
  PTED_PTED7 = c & 0x01;
  PTED_PTED6 = (c >> 1) & 0x01;
  PTCD_PTCD5 = (c >> 2) & 0x01;
  PTCD_PTCD4 = (c >> 3) & 0x01;
  PTCD_PTCD3 = (c >> 4) & 0x01;
  PTCD_PTCD2 = (c >> 5) & 0x01;
  PTCD_PTCD1 = (c >> 6) & 0x01;
  PTCD_PTCD0 = (c >> 7) & 0x01;
  return ;
}

void wait(unsigned int time){
  volatile unsigned int c;

  for (c = 0; c < time; c++) ;
  return ;
}
リスト6
どうですか? これまでの実習でデモ・ボードのハードウェアを変更することなくソフトウェアの変更だけでいろいろな機能が実現できたことに着目してください。余裕のある人は、LEDのカウンタの速度を変えたり、点滅パターンを変えたりしてみるなど、いろいろ試してGPIOの操作に慣れてください。
いかがでしたか。いろいろ試したような気がしますが、今回も基本のGPIOだけ使ってLEDを制御しました。次回は、制御に時間の概念を入れてみます。マイコン制御プログラムの世界がさらに広がりますよ。第4回をお楽しみに!(次回に続く)
Copyright © ITmedia, Inc. All Rights Reserved.
Special ContentsPR
特別協賛PR
スポンサーからのお知らせPR
Special ContentsPR
Pickup ContentsPR
組み込み開発の記事ランキング
- “Hello, World”と「Lチカ」の共通点
- インフィニオンのヒューマノイド向け半導体戦略、2050年に3億台の市場を捉える
- サブ1nm半導体チップ技術を発表、性能最大50%向上
- Terra Drone、屋内点検用ドローン運用チームを熊本県の被災地へ派遣
- AIエージェントが車載アプリを動的に生成、イーソルがAIDVに向けた実験場を披露
- フィジカルAI時代のロボティクス新標準、安全性は「後付け」でなく「設計の核心」
- 富士通からC/C++およびJava対応のソースコード解析ツールの資産を取得
- MediaTek製SoCを搭載するSOMの事業を拡大、エッジAI開発の支援に向け
- “3つの頭脳”で80TOPSの処理性能を実現 AMDが語る「次世代AIチップ」戦略
- 上面放熱構造により高放熱と高耐圧を両立したSiC-MOSFETの新パッケージ
Special SitePR
コーナーリンク


あなたにおすすめの記事PR
![]() ITmediaはアイティメディア株式会社の登録商標です。
ITmediaはアイティメディア株式会社の登録商標です。