FPGAの内蔵温度センサーから値を得る:MAX 10 FPGAで学ぶFPGA開発入門(13)(1/6 ページ)
アルテラのFPGA「MAX 10」には温度センサーが内蔵されており、自身の温度を測定可能だ。メガファンクション「ALTPLL」を使い、内蔵センサーからの値を得るまでを試みる。
» 2016年08月10日 09時00分 公開
[大原雄介,MONOist]
この連載ではFPGA開発を学ぶため、アルテラのFPGA「MAX 10」を用いた開発手法を紹介している。ここ数回は各種周辺機器も備えたMAX10搭載開発ボード「MAX 10 NEEK」を使った周辺機器の利用方法を取り上げており、今回はODT(On Die Temperature)センサーを利用する仕組みを解説したい。
手法としては、以前にこの記事(MAX 10 FPGAで学ぶFPGA開発入門(6):FPGA上でソフトコアCPUを動かす手引き )で紹介したもので、まずは前回のサンプルスケッチをそのまま再現して、そこからいくつか追加することにしたい。というわけで、まずは前回手順のご紹介。
プロジェクト作成からQSYSでの追加まで
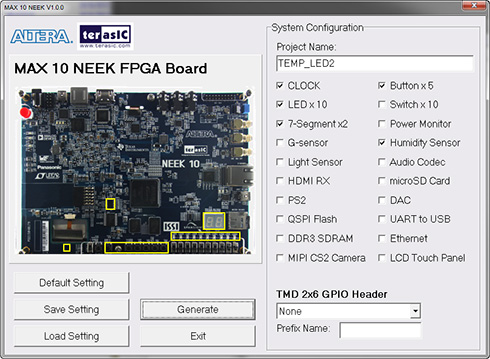
- System BuilderでCLOCK / LED×10 / 7-Segment×2 / Button×5 / Humidity Sensorをチェックしてプロジェクトを生成(Photo01)
- System Builderで生成したプロジェクトファイルを、Quartus IIのプロジェクトディレクトリにコピー
- Quartus II(今回も15.0を利用)を起動し、生成したプロジェクトファイル( TEMP2_LED.qpf )を開く。
- QSYSを起動し、以下のコンポーネントを追加する。
| QSYS起動後に追加するコンポーネント | |
|---|---|
| プロセッサコア | ”Processors and Peripherals” → ”Embedded Processors” → ”NIOS II Processor”で追加。種別はNIOS II/eを指定 |
| JTAG UART | ”Interface Protocols” → ”Serial” → ”JTAG UART” |
| オンチップメモリ | ”Basic Functions” → ”On Chip Memory” → ”On-Chip Memory (RAM or ROM)”。メモリ容量は128KBとし、”Initialize memory content”のチェックを外しておく。またこれを追加後に、nios2_gen2_0のプロパティを開き、”Vectors”タブで”Reset Vector”と”Exception Vector”を共に”onchip_memory2_0.s1”に設定する |
| LEDR(LED×10) | ”Processors and Peripherals” → ”Peripherals” → ”PIO(Parallel I/O)”でPIOを追加する。この際Widthを10bit、DirectionはOutputを指定し(Photo02)、名前を”LEDR”に変更する。またConduitを”ledr_pio”とする |
| HEX0(7セグメントLED #1) | ”Processors and Peripherals” → ”Peripherals” → ”PIO(Parallel I/O)”でPIOを追加する。この際Widthを7bit、DirectionはOutputを指定し、名前を”HEX0”に変更する。またConduitを”hex0_pio”とする |
| HEX1(7セグメントLED #2) | ”Processors and Peripherals” → ”Peripherals” → ”PIO(Parallel I/O)”でPIOを追加する。この際Widthを7bit、DirectionはOutputを指定し、名前を”HEX1”に変更する。またConduitを”hex1_pio”とする |
| KEY(Button×5) | ”Processors and Peripherals” → ”Peripherals” → ”PIO(Parallel I/O)”でPIOを追加する。この際Widthを5bit、DirectionはInputを指定し、名前を”KEY”に変更する。またConduitを”key_pio”とする |
| RH_TEMP_I2C_SCL | ”Processors and Peripherals” → ”Peripherals” → ”PIO(Parallel I/O)”でPIOを追加する。この際Widthを1bit、DirectionはOutputを指定し、名前を”RH_TEMP_I2C_SCL”に変更する。またConduitを”rh_temp_i2c_scl_pio”とする |
| RH_TEMP_I2C_SCL | ”Processors and Peripherals” → ”Peripherals” → ”PIO(Parallel I/O)”でPIOを追加する。この際Widthを1bit、DirectionはBidirを指定、追加後に名前を”RH_TEMP_I2C_SDA”に変更する。またConduitを”rh_temp_i2c_sda_pio”とする |
| RH_TEMP_DRDYN | ”Processors and Peripherals” → ”Peripherals” → ”PIO(Parallel I/O)”でPIOを追加する。この際Widthを1bit、DirectionはInputを指定、追加後に名前を”RH_TEMP_DRDY_N”に変更する。またConduitを”rh_temp_drdy_n_pio”とする |
ここまでは前回と同じである。
関連記事
 オンボードされた温湿度センサーからFPGAで値を得る
FPGA「MAX 10」搭載開発ボード「MAX 10 NEEK」には各周辺機器が備えられており、そこにはTI製の温湿度センサーも含まれる。サンプルプログラムを元に、オンボードされたデバイスの制御を試みる。 「MAX 10 NEEK」でストップウォッチを開発し、内蔵メモリから起動する
アルテラのFPGA「MAX 10」を搭載した開発ボード「MAX 10 NEEK」にはLEDやフラッシュメモリなどの各周辺機器が備えられている。今回はLEDを使ったストップウォッチを開発し、内蔵メモリから起動する。 「MAX 10 NEEK」に搭載されたDDR3メモリを使う
MAX10搭載開発ボード「MAX 10 NEEK」には各周辺機器が備えられており、その中にはDDR3メモリも含まれる。ソフトコアCPU「Nios II」からの利用も含めて手順を紹介する。 「MAX 10 NEEK」へソフトコアCPUを組み込む
周辺機器の充実したMAX10搭載開発ボード「MAX 10 NEEK」に、ソフトコアCPU「NIOS II」を組み込み、ソフトコアCPUからボード搭載LEDの制御までを紹介する。 周辺機器の充実した「MAX 10 NEEK」で本格的な開発を目指す
FPGA開発において周辺機器(回路)は見落とせない要素の1つ。タッチパネルや各種出入力などを備えた「MAX 10 NEEK」を導入して、本格的な開発を目指す。
Copyright © ITmedia, Inc. All Rights Reserved.
Special ContentsPR
特別協賛PR
スポンサーからのお知らせPR
Special ContentsPR
Pickup ContentsPR
組み込み開発の記事ランキング
- イチから全部作ってみよう(29)3つのノート整理法からたどるRDBMSの基礎知識
- 月面を照らす「光の物差し」 JAXAとカシオが可視光測位技術を実証
- 東芝の2つの次世代ゲート駆動技術がSiCデバイスの損失削減に寄与、ISSCCで発表
- NXPがエッジへのAIエージェント実装を推進、数百TOPSクラスの新たなNPUも開発へ
- AUTOSARの“AR”はアーキテクチャに由来、アーキテクチャ設計にどう使うのか
- 買い物客の8割が求める「自分だけの割引」、小売業はどう対応すべきか
- クレーンゲームにIoTデバイスを搭載しスマホ決済、新店の約370台に搭載
- インフィニオンがams OSRAMのセンサー事業を買収、自動車や医療向けを強化
- TFT技術とメタマテリアル技術を融合した衛星アンテナ用基板を共同開発
- 急成長中の中国ヒューマノイド大手AgiBotの技術戦略
Special SitePR
コーナーリンク
あなたにおすすめの記事PR


