「Jetson Nano」でにゃんこを判別してLチカで知らせるエッジAIデバイスを作る:Jetson Nanoで組み込みAIを試す(5)(3/4 ページ)
imagenet-cameraを利用してLチカのロジックを実装
ここまで終わったら、いよいよプログラムである。今回はimagenet-cameraを利用して以下のロジックを実装することにした。
- 猫を判別したら黄色のLEDが点灯、さもなくば消灯
- 猫がTabby catだったら緑色のLEDも点灯
さて、そのソースはこちらである(リスト2)
import jetson.inference
import jetson.utils
import argparse
# for LED output
import RPi.GPIO as GPIO
pin_cat = 13
pin_tabby = 6
# parse the command line
parser = argparse.ArgumentParser(description="Classify a live camera stream using an image recognition DNN.",
						   formatter_class=argparse.RawTextHelpFormatter, epilog=jetson.inference.imageNet.Usage())
parser.add_argument("--network", type=str, default="googlenet", help="pre-trained model to load, see below for options")
parser.add_argument("--camera", type=str, default="0", help="index of the MIPI CSI camera to use (NULL for CSI camera 0),\nor for VL42 cameras the /dev/video node to use (/dev/video0).\nby default, MIPI CSI camera 0 will be used.")
parser.add_argument("--width", type=int, default=1280, help="desired width of camera stream (default is 1280 pixels)")
parser.add_argument("--height", type=int, default=720, help="desired height of camera stream (default is 720 pixels)")
opt, argv = parser.parse_known_args()
# setup GPIO
GPIO.setmode(GPIO.BCM)
GPIO.setup(pin_cat,   GPIO.OUT, initial=GPIO.HIGH)
GPIO.setup(pin_tabby, GPIO.OUT, initial=GPIO.HIGH)
# load the recognition network
net = jetson.inference.imageNet(opt.network, argv)
# create the camera and display
font = jetson.utils.cudaFont()
camera = jetson.utils.gstCamera(opt.width, opt.height, opt.camera)
display = jetson.utils.glDisplay()
# process frames until user exits
while display.IsOpen():
	# capture the image
	img, width, height = camera.CaptureRGBA()
	# classify the image
	class_idx, confidence = net.Classify(img, width, height)
	# find the object description
	class_desc = net.GetClassDesc(class_idx)
        # Check cat exist or not
        if "cat" in class_desc:
                GPIO.output(pin_cat, GPIO.HIGH)
                if "tabby" in class_desc:
                        GPIO.output(pin_tabby, GPIO.HIGH)
                else:
                        GPIO.output(pin_tabby, GPIO.LOW)
        else:
                GPIO.output(pin_cat, GPIO.LOW)
                GPIO.output(pin_tabby, GPIO.LOW)

	# overlay the result on the image
	font.OverlayText(img, width, height, "{:05.2f}% {:s}".format(confidence * 100, class_desc), 5, 5, font.White, font.Gray40)

	# render the image
	display.RenderOnce(img, width, height)
	# update the title bar
	display.SetTitle("{:s} | Network {:.0f} FPS".format(net.GetNetworkName(), 1000.0 / net.GetNetworkTime()))
	# print out performance info
	net.PrintProfilerTimes()
リスト2において、元のソース(imagenet-camera.py)から変更(というか追加)した部分は、4〜7行目、16〜19行目、34〜43行目になる。
まずは、4〜7行目にあるimport RPi.GPIO as GPIOが、Jetson.gpioパッケージを使うための宣言である(リスト3)。次のpin_catとpin_tabbyの値がちょっと分かりにくいと思う。先にシェルから直接たたいたケースでは、cat(33番ピン)はgpio38、tabby(31番ピン)はgpio200という番号になっていたが、RPi.GPIOの中ではこれとは全く異なる番号が割り当てられている。この番号はこちらを見ると分かるが、Jetson Nanoはそれぞれ13番と6番を指定する必要がある。
さて、起動したらまずGPIOのセットアップが必要である。それが16〜19行目のGPIO.setmode()とGPIO.setup()の部分である(リスト4)。ちなみに初期値がGPIO.HIGHなのは、GPIOパッケージではHIGHだと電流が流れない(LOWで流れる)という仕様のためである。
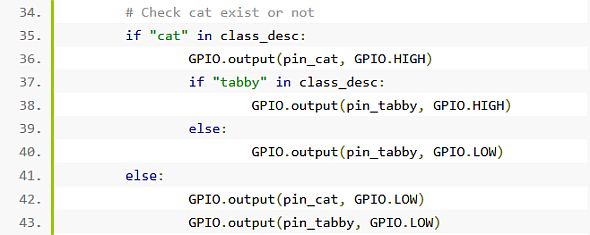
メインとなるのは34〜43行目の部分である(リスト5)。先にも書いたが、class_descという変数には、最終的に確定した対象の種別が文字列で入っている。このため、まずは“cat”という文字列が入っているかどうかをin演算子でチェック。もし入っていたら、次にtabbyも入っているか、同じ様にチェックする。両方入っていれば両方のLEDを点灯、catだけなら緑色は消灯、catが入っていなければ両方とも消灯という、シンプルなものである。
Copyright © ITmedia, Inc. All Rights Reserved.
組み込み開発の記事ランキング
- 月面を照らす「光の物差し」 JAXAとカシオが可視光測位技術を実証
- 生成AI実行時の消費電力が10W以下に SiMa.aiのSoC「Modalix」の実証結果を公開
- 1μF以下の極小コンデンサーでも安定動作する500mA対応LDOレギュレーター
- フォックスコンがフィジカルAIで実現する「AX」とは、NVIDIAと川崎重工も講演
- 衛星通信向け量子鍵配送送受信システムの小型化と高速化に成功
- いまさら聞けないエッジAIとクラウドAIの違い “現場処理回帰”の必然性とは
- 高速起動とREST APIで高性能なデータ取得を自動化する測定コア
- 時代はDXからAIが当たり前に浸透する「IX」に突入へ CES 2026の内容をひもとく
- 愛猫の不調を見逃さない、LIXILが非接触呼吸計測デバイスを開発
- 現場や事務用途で快適に使える防塵防水対応の10.1型タブレットPCを発売
コーナーリンク

 リスト3 リスト2の4〜7行目
 リスト4 リスト2の16〜19行目
 リスト5 リスト5の34〜43行目

